---
title: How do I change the destination Workspace for my Sound Capsule uploads?
description: "Note: You must select a workspace where you have upload rights. You must be an editor or an admin in the selected workspace in order to upload a recording. "
---
[Skip to content](https://support.nomono.co/how-do-i-change-the-destination-for-my-sound-capsule-uploads#main-content)
[Contact us](https://support.nomono.co/kb-tickets/new?hsLang=en)
[![nomono-logo-default-on-light (1) (1)-2.svg\]](https://support.nomono.co/hubfs/nomono-logo-default-on-light%20(1)%20(1)-2.svg)](https://nomono.co)
Open main navigation
Close main navigation
- [Contact us](https://support.nomono.co/kb-tickets/new)
- [Go to nomono.co](https://nomono.co/)
[Go to nomono.co](https://nomono.co/)
How can we help you?
- There are no suggestions because the search field is empty.
1. [Knowledge Base](https://support.nomono.co/?hsLang=en)
2. [Sound Capsule](https://support.nomono.co/sound-capsule?hsLang=en)
3. [Sound Capsule FAQ](https://support.nomono.co/sound-capsule?hsLang=en#sound-capsule-faq)
# How do I change the destination Workspace for my Sound Capsule uploads?
#### Before you get started, be aware that you can identify the currently selected workspace on your Sound Capsule's display.
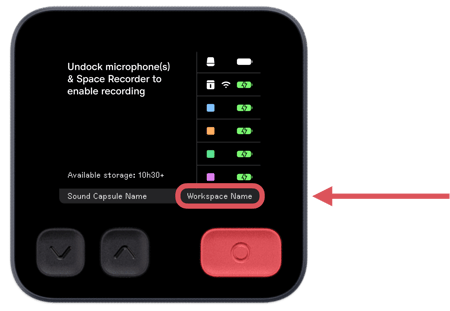
### Workspace selection in the Studio App
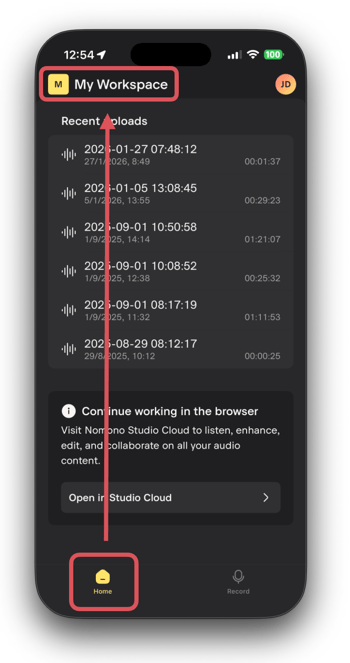
#### Step 1 - From the **Home tab**, click on the workspace title at the top of the screen
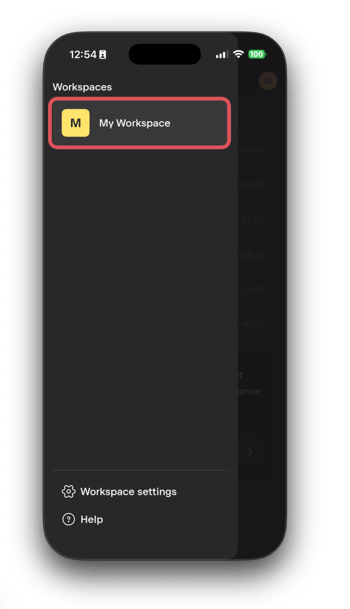
#### Step 2 - Select the workspace you want to upload recordings to. Note: Several workspaces may appear in the list - ensure you select a workspace you have upload rights to.
#### Step 3 - From the **Record tab** enter the Sound Capsule kit. Note: The Sound Capsule must be powered on and connected.
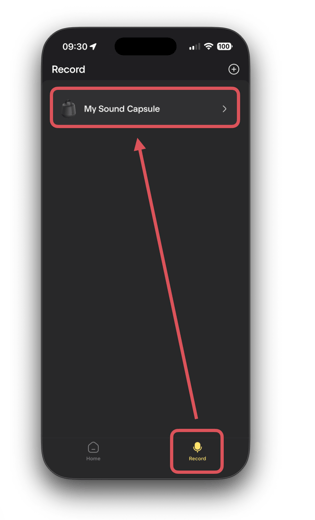
#### Step 4 - Observe that the destination workspace is now correctly set, both in the Studio App and on the Space Recorder display. 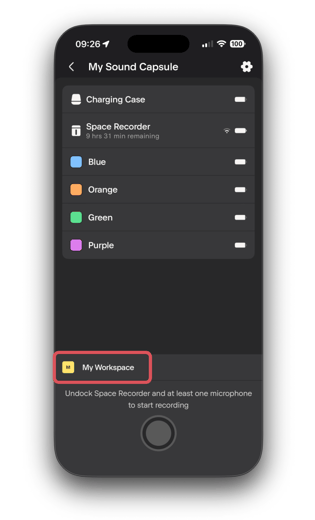
**Note:** You must select a workspace where you have **upload rights**. You must be an editor or an admin in the selected workspace in order to upload a recording.
- [Getting Started](https://support.nomono.co/getting-started?hsLang=en#main-content)
- [Introduction](https://support.nomono.co/getting-started?hsLang=en#introduction)
- [Get to know your Sound Capsule](https://support.nomono.co/getting-started?hsLang=en#get-to-know-your-sound-capsule)
- [First Time Use](https://support.nomono.co/getting-started?hsLang=en#first-time-use)
- [User Manual](https://support.nomono.co/getting-started?hsLang=en#user-manual)
- [Tutorials](https://support.nomono.co/getting-started?hsLang=en#tutorials)
- [Sound Capsule](https://support.nomono.co/sound-capsule?hsLang=en#main-content)
- [Charging and Battery](https://support.nomono.co/sound-capsule?hsLang=en#charging-and-battery)
- [Sound Capsule FAQ](https://support.nomono.co/sound-capsule?hsLang=en#sound-capsule-faq)
- [Stellar Mics FAQ](https://support.nomono.co/sound-capsule?hsLang=en#stellar-mics-faq)
- [Travelling with the Sound Capsule](https://support.nomono.co/sound-capsule?hsLang=en#travelling-with-the-sound-capsule)
- [Troubleshooting](https://support.nomono.co/sound-capsule?hsLang=en#troubleshooting)
- [USB File Transfer](https://support.nomono.co/sound-capsule?hsLang=en#usb-file-transfer)
- [Video and live streaming](https://support.nomono.co/sound-capsule?hsLang=en#video-and-live-streaming)
- [Wi-Fi and Connectivity](https://support.nomono.co/sound-capsule?hsLang=en#wi-fi-and-connectivity)
- [Stellar Kit](https://support.nomono.co/stellar-kit?hsLang=en#main-content)
- [FAQ](https://support.nomono.co/stellar-kit?hsLang=en#faq)
- [Troubleshooting](https://support.nomono.co/stellar-kit?hsLang=en#troubleshooting)
- [Studio Cloud](https://support.nomono.co/studio-cloud?hsLang=en#main-content)
- [Account](https://support.nomono.co/studio-cloud?hsLang=en#account)
- [AI Enhancement](https://support.nomono.co/studio-cloud?hsLang=en#ai-enhancement)
- [Cloud FAQ](https://support.nomono.co/studio-cloud?hsLang=en#cloud-faq)
- [Collaborating and Sharing](https://support.nomono.co/studio-cloud?hsLang=en#collaborating-and-sharing)
- [Commenting](https://support.nomono.co/studio-cloud?hsLang=en#commenting)
- [Editing](https://support.nomono.co/studio-cloud?hsLang=en#editing)
- [Subscription](https://support.nomono.co/studio-cloud?hsLang=en#subscription)
- [Troubleshooting](https://support.nomono.co/studio-cloud?hsLang=en#troubleshooting)
- [Uploads and Downloads](https://support.nomono.co/studio-cloud?hsLang=en#uploads-and-downloads)
- [Orders, shipping and returns](https://support.nomono.co/orders-shipping-and-returns?hsLang=en#main-content)
- [Orders](https://support.nomono.co/orders-shipping-and-returns?hsLang=en#orders)
- [Payment and billing](https://support.nomono.co/orders-shipping-and-returns?hsLang=en#payment-and-billing)
- [Returns](https://support.nomono.co/orders-shipping-and-returns?hsLang=en#returns)
- [Shipping](https://support.nomono.co/orders-shipping-and-returns?hsLang=en#shipping)
- [Warranty](https://support.nomono.co/orders-shipping-and-returns?hsLang=en#warranty)
- [Updates and New Features](https://support.nomono.co/updates-and-new-features?hsLang=en#main-content)
- [Sound Capsule](https://support.nomono.co/updates-and-new-features?hsLang=en#sound-capsule)
- [Nomono Cloud](https://support.nomono.co/updates-and-new-features?hsLang=en#nomono-cloud)
- [Guides](https://support.nomono.co/updates-and-new-features?hsLang=en#guides)
[-2.png?width=160&height=24&name=logo%20(1)-2.png "Chill listening crop-3")](http://nomono.co)
Knowledge Base
Copyright © 2026, Nomono