Getting Started with Nomono Cloud
Signing up:
When accessing Nomono Cloud for the first time, you can sign up using one of the following methods:

- Continue with Google
Use your Google account to quickly sign up and access Nomono Cloud. - Continue with Apple
Use your Apple ID to securely create an account and sign in. - Sign up with Email
Prefer using your email? Enter your email address to create an account manually. - Already have an account?
If you’ve already created an account, click Log in here to access Nomono Cloud.
Logging in:
To access your Nomono account, choose one of the following login methods:

- Continue with Google
Use your Google account to quickly log in and access Nomono Cloud. - Continue with Apple
Use your Apple ID for a seamless and secure login experience. - Log in with Email
Enter your Email address and Password to log in manually.- If you’ve forgotten your password, click Forgot password? to reset it.
Homepage:

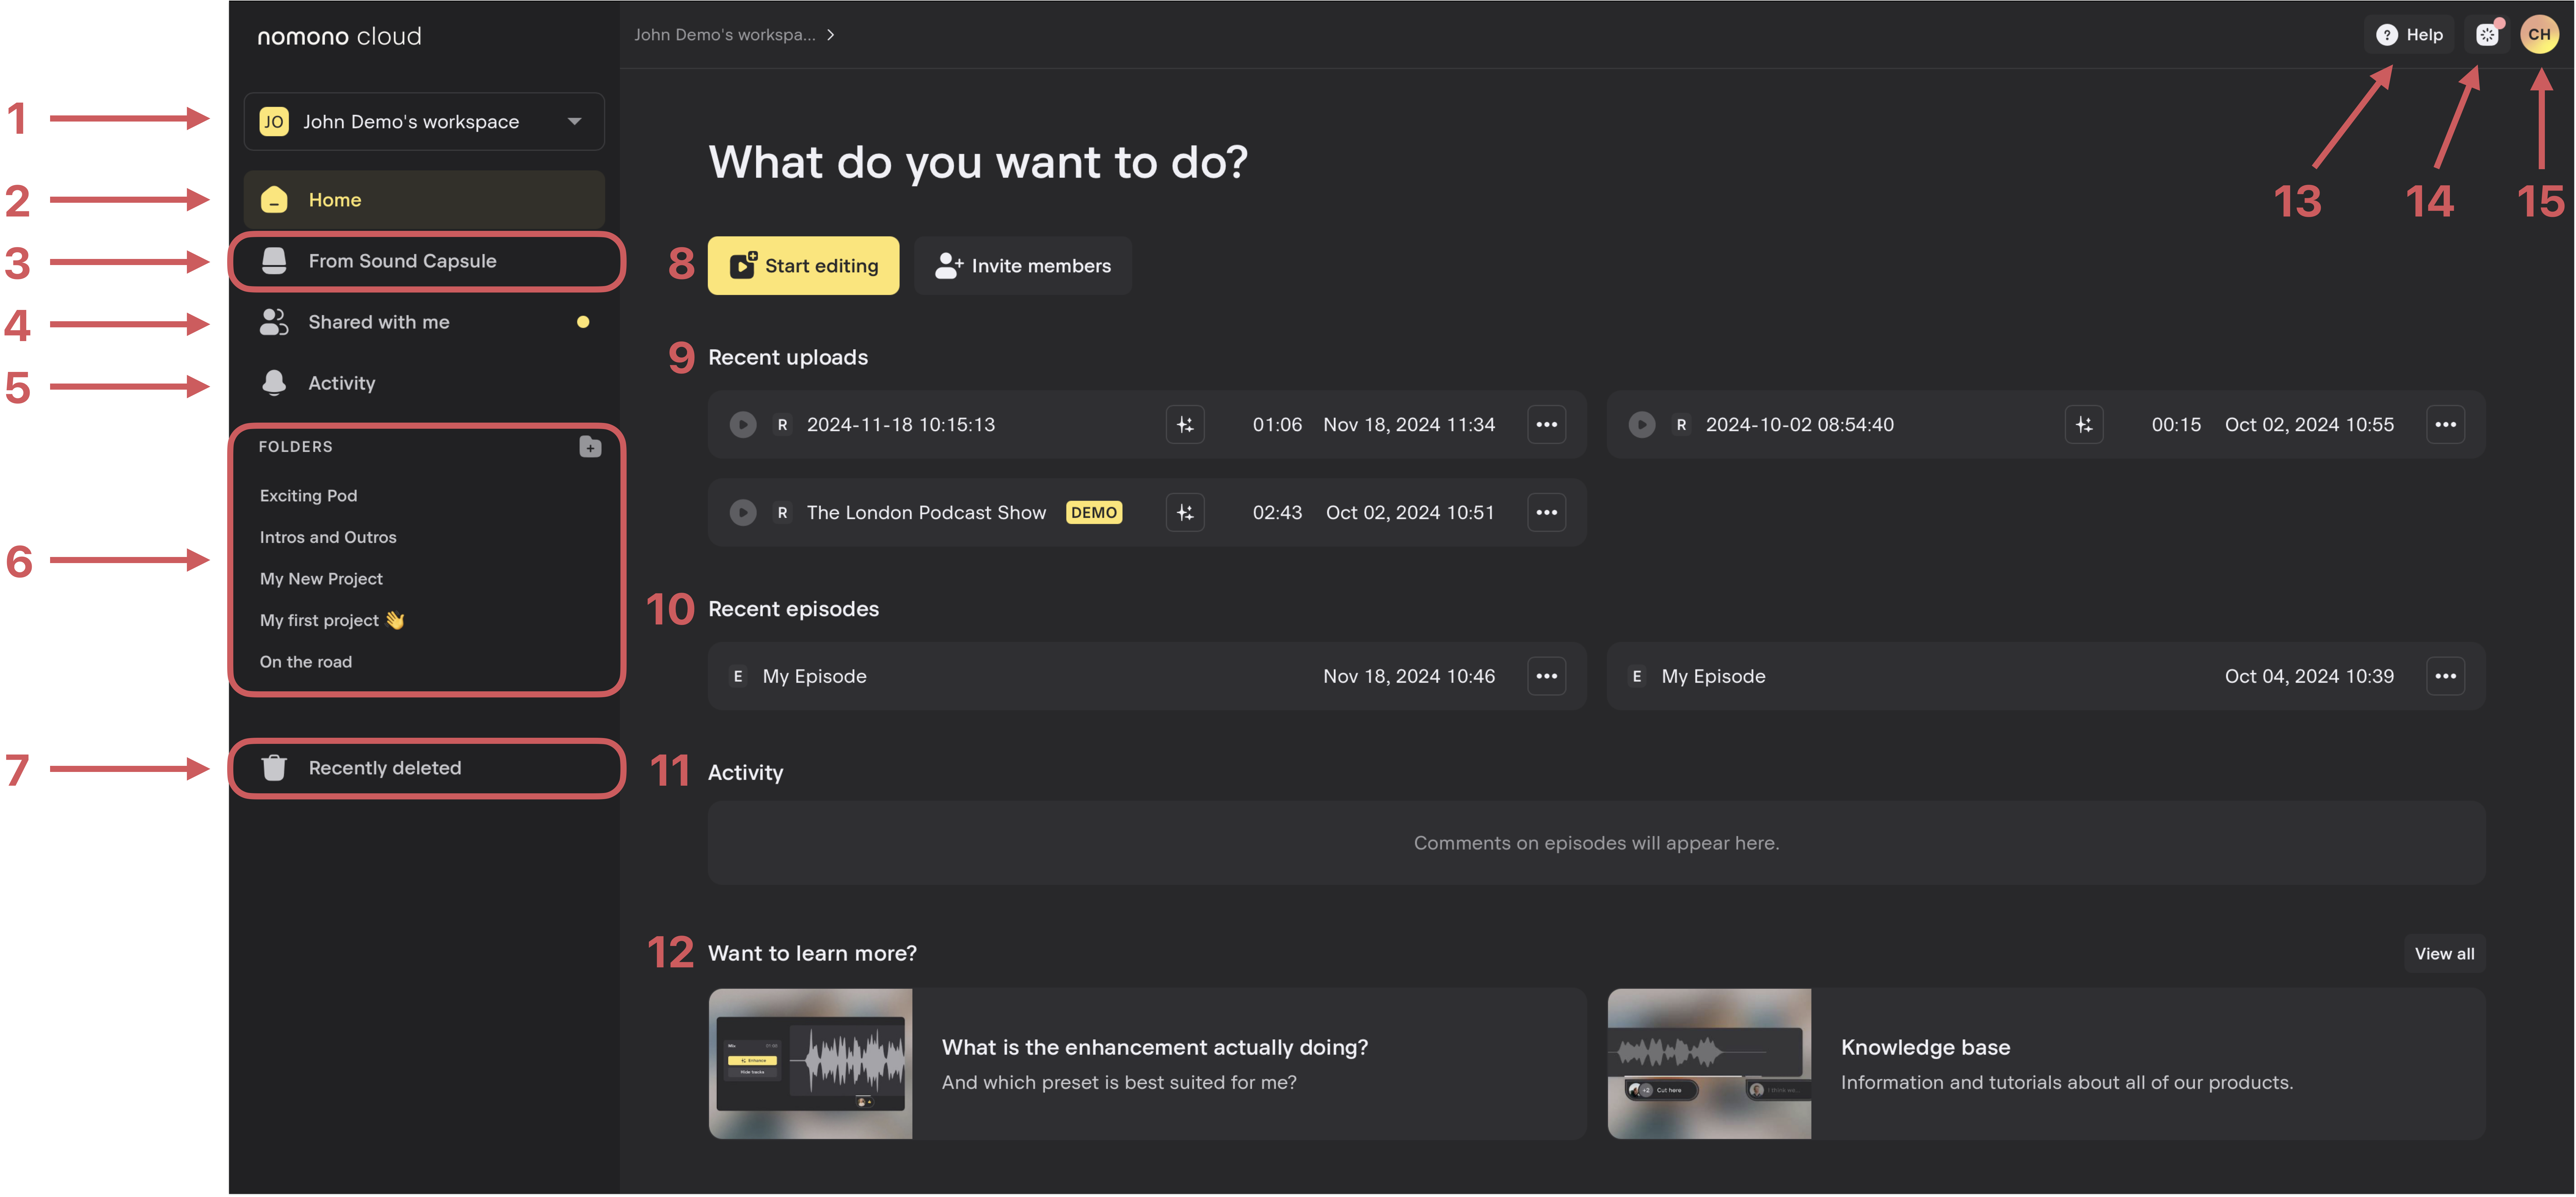
The Nomono Cloud homepage is your hub for managing and organizing your work. Here’s a breakdown of its key features:
- Workspace Selector
Choose the workspace you want to work in. - Home
Navigate to the homepage. - From Sound Capsule
View uploads directly from your Sound Capsule. - Shared with Me
Access files and episodes shared by other users. - Activity
Check comments and feedback from collaborators. - Folders
Organize your work and projects into folders for better compartmentalization and sorting. - Recently Deleted
Find files and episodes that have been deleted. - Shortcuts
- Start Editing: Quickly create an episode.
- Invite Members: Add members to your workspace.
- Recent Uploads
View your four most recent uploads, similar to “From Sound Capsule.” - Recent Episodes
Access a shortcut to your most recent episodes. - Activity
See recent activity from your collaborators. - Want to Learn More?
Access tips, tricks, and tutorials to get the most out of Nomono Cloud. - Help
Find keyboard shortcuts for editing or contact Nomono for support. - Background Tasks
Monitor the progress of uploads, downloads, or enhancement processing. - Account and Workspace Settings
Access your settings, payment information, storage, and member management.
Working with Folders:
When working with audio—whether it’s podcast production or other content creation—organization is key. Being organized not only helps you locate your files but also saves time and increases efficiency. That’s why Nomono offers an easy-to-use folder system.
In this section, we provide tips and tricks to simplify your workflow in Nomono Cloud.

Creating a Folder
- Click the folder symbol in the left-hand side menu to create a new folder.
- Rename the folder and press Enter.
Once inside a folder, you’ll find a set of buttons and options to populate it with content.

Folder Features and Options
- Create Episode
Use this button to start creating a new episode directly within the folder. - Upload Files
Upload audio or other files from your computer into the current folder. - New Folder
Create subfolders within the current folder to further organize your content. - Folders
View and access additional subfolders you’ve created within the main folder. - Episodes
Find and manage your episodes. This is where you’ll create and edit podcasts or other audio projects. - Recordings
Access Sound Capsule recordings or other uploaded audio files (except those you’ve moved into folders).
Recommendations for Folder Organization
Nomono recommends keeping all related work in one main folder. Use subfolders to organize specific content, such as:
- Music or Audio Library: Store background music, sound effects, and similar assets in one folder.
- Intro Audio: Keep voiceovers, intro music, or ads you frequently use in a dedicated folder.
- Outro Audio: Organize outro voiceovers, music, and other recurring content separately.
Episode Management Tip
For each podcast episode, create a new episode file in your folder. This approach ensures everything stays organized, and you’ll have backups or archives for each episode, making it easy to revisit and re-edit content later.
Importing Sound Capsule Recordings:
After recording an interview or similar content with your Sound Capsule, the next step is to import and organize the recording within Nomono Cloud. Here’s how to do it:
Step 1: Import the Recording
- Navigate to the Home page.
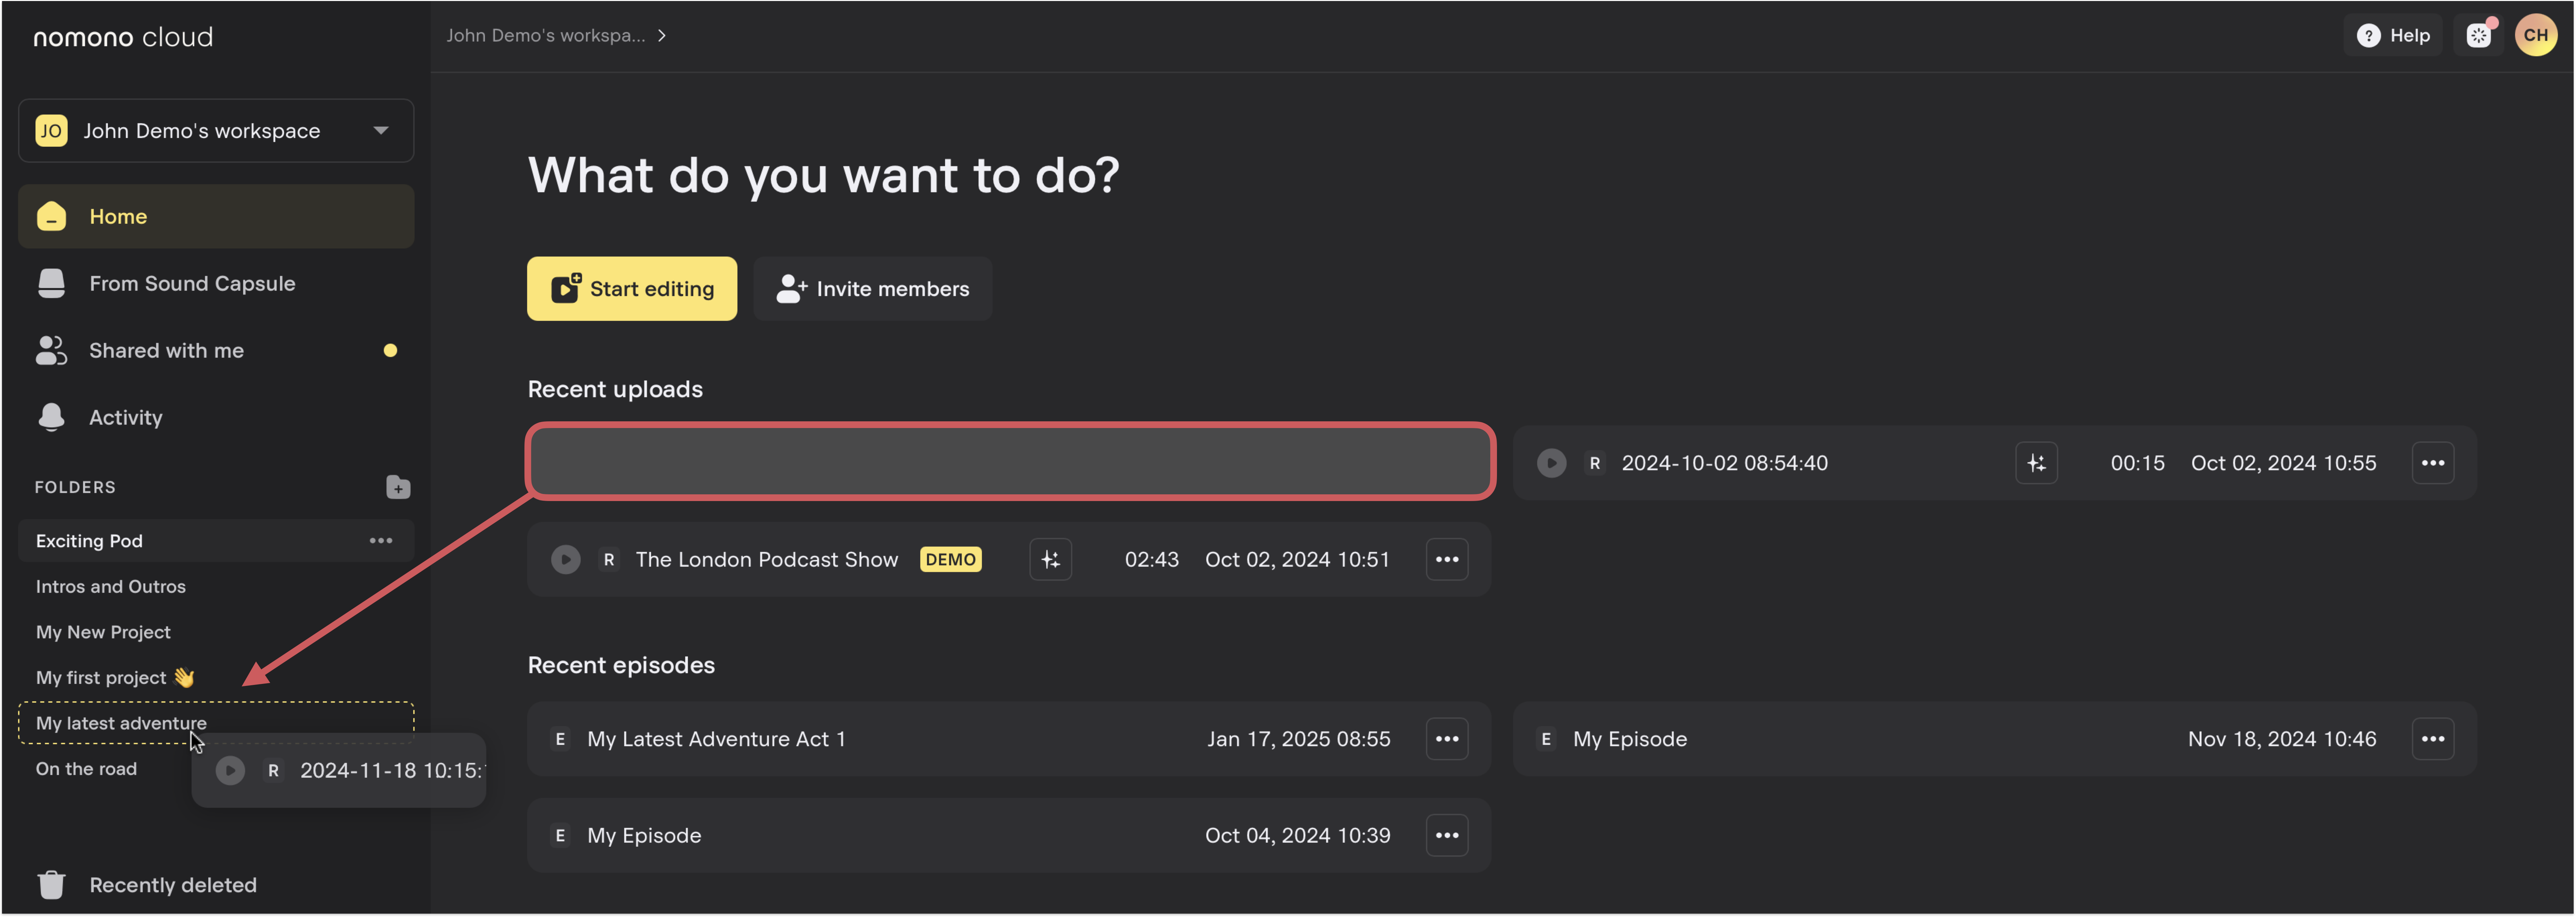
- Drag and drop your recording into the desired folder.
Alternatively, go to the From Sound Capsule section and select recordings to add to a folder.

Step 2: Locate the Recording in the Folder
Once the recording is added, it will appear under the Recordings section within the selected folder.
You are now ready to begin working with the recording.

Step 3: Create an Episode and Select your Recording
While inside folder and click Create Episode.
- Inside the episode editor, you’ll see a prompt stating that there is no audio in the episode yet.
- Click the Add Recording from Library button.
A pop-up window will appear, displaying the recordings in the current folder under the Recordings section.
- Select the recording you just added.
- Optionally, navigate to subfolders to add intro/outro audio or upload additional files directly from this menu.
- Click Add Recording to insert the selected file into your episode.

Introduction to the Audio Editor:
The Nomono Cloud audio editor operates similarly to popular Digital Audio Workstations (DAWs), but it stands out by running entirely in your web browser. This eliminates the need for a powerful computer, offering a streamlined editing experience directly online.
Below is an overview of the key features available in the editor:

- Audio File Manager
- Click the ”+” icon to import additional audio files into your episode.
- Audio Lane
- Each audio lane can be named to ensure easy navigation and better organization.
- Click the ”…” button to rename or delete a lane.
- Master Volume
- Use the master volume slider to adjust the overall volume of an audio lane.
- Add Audio
- Click this shortcut to quickly import more audio into your episode.
- Add Empty Lane
- Add a blank lane for new audio or other editing purposes.
- Editing Toolbar
This toolbar contains essential tools for editing audio:- Volume Adjustment: Fine-tune the volume at specific points in the audio.
- Enhance: Use AI-powered tools to improve audio quality.
- Comment: Add comments for collaboration or reminders.
- Split: Divide an audio clip into smaller sections.
- Cut, Copy, Paste, Delete: Standard editing actions.
- Undo/Redo: Quickly reverse or reapply recent changes.
- Playhead
- The playhead indicates your current position within the episode and moves when you press play.
- You can drag it to a specific point to start playback or editing from that location.
- Enhance Button
- Each audio clip has an AI Enhancement button for applying enhancements on a clip-by-clip basis.
- This selective processing helps conserve AI enhancement minutes by focusing only on the necessary parts of your recording.
- Comments
- Opens a dedicated window where you can view, add, edit, or delete comments for collaborative purposes.
For more guidance on editing in Nomono Cloud, please refer to these articles.