There are two ways of sharing recordings from your Nomono Cloud account:
- Share a recording: The person you share your recording with will only get access to this specific recording.
- Add members to your workspace: When adding a member into your workspace, they have access to all recordings within your Workspace and all future recordings uploaded into your Workspace.
This article will focus on the latter and will provide you with a detailed walkthrough on:
- How to add team members in your Workspace.
- How to remove team members in your Workspace.
Adding team members to your Workspace
Step 1
Selecting the correct workspace
First, lets ensure you are adding members to the intended Workspace.
- Verify the correct Workspace is selected as depicted in the image below. If you need to switch the Workspace, click on the currently selected Workspace name displayed.
This should prompt a drop down menu to appear, listing all your Workspaces.

Step 2
Switching your workspace (if the correct one is not selected)
Within the drop down menu:
- Click on the Workspace where you wish to add team members.
In the example shown below, we choose "John's Workspace."

Step 3
Accessing Workspace settings
Now, that you have the correct Workspace selected:
- Click on the circular icon located in the top right corner.

Step 4
Entering Workspace settings
In the drop down menu:
- Select Workspace Settings.
This will take you to the settings page for the selected Workspace.

Step 5
Navigating to the members section
In the settings page:
- Click on "Members"

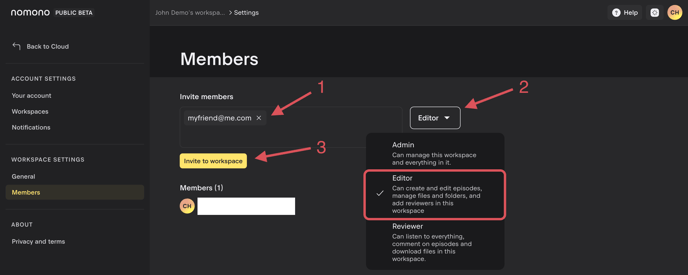
Step 6
Adding members
On the members page:
- Add team members by by entering their email addresses in the provided text box. You have the option to add one or multiple emails simultaneously.
- Complete the process by clicking "Add People."
Great, that was all!
New members will receive an email invitation and will be prompted to create an account if they don't already have one.
Should the new team members encounter any difficulties in accessing the recordings, advise them to verify they have the correct Workspace selected as outlined in Steps 1 and 2 above.
Removing team members from your Workspace
Step 1
Selecting the correct workspace
Prior to removing a Workspace member, ensure that you have the right Workspace selected.
- Verify the correct Workspace is selected as depicted in the image below. If you need to switch the Workspace, click on the currently selected Workspace name displayed.
This should prompt a drop down menu to appear, listing all your Workspaces.
Step 2
Switching your workspace (if the correct one is not selected)
Within the drop down menu:
- Click on the Workspace where you wish to remove team members.
In the example shown below, we choose "John's Workspace."
Step 3
Accessing Workspace settings
Now, that you have the correct Workspace selected:
- Click on the circular icon located in the top right corner.
Step 4
Entering Workspace settings
In the drop down menu:
- Click Settings.
This will take you to the settings page for the selected Workspace.
Step 5
Navigating to the members section
In the settings page:
- Click on "Members"
Step 6
Selecting a member for removal
On the members page, locate the member you wish to remove:
- Click on "Member" next to their name, as demonstrated in the image below.

Step 7
To finalize the removal: click on "Remove."
- Click on "Remove".

That's it!
After completing these steps, the team member will no longer have access to your Workspace and the recordings within your Workspace.
Please note that you cannot remove an Admin.
Need assistance?
If you have any queries, suggestions, or require assistance, our customer support team is always ready to help. Feel free to reach out to us here. We are committed to ensuring you have the best experience with Nomono.