Introduction to USB file transfer
This article will guide you through the installation process you must complete in order to enable USB file transfer between your Sound Capsule and other equipment.
Step 1: Update
If your Sound Capsule is on firmware version 2024.10.09 or older, an update prompt should appear on your device when it is next online.
Note: If this does not appear as shown below, then you may follow this guide to get the installation process started.

Note: The software version may differ from the illustration above. Please check our changelog for up-to-date details.
Step 2: Additional update - Enable USB
After completing the software update process outlined in Step 1 above, the prompt shown below will appear on your Space Recorder's display. You will need to press the Up Arrow button in order to proceed with the installation process.

Another page appears with additional information regarding the installation process. Press the Up Arrow button once more in order to proceed with the installation process.

The Space Recorder display will now change and the device may power off and on several times during the installation process, which is expected to take a few minutes to complete.
Important: Ensure all your recordings are available in Nomono Cloud prior to starting the USB feature update.

Step 3: Locate Local Storage and Allow USB Transfer settings
Once your Sound Capsule has rebooted and you have returned to the Home Screen, you may make changes to your Sound Capsules storage settings. This can be done via your Sound Capsules Control Panel, or from the Nomono Companion App.
Option 1: Space Recorder control panel
- Enter the Control Panel by pressing and holding the Down Arrow button for approximately 5 seconds:

- Use the Arrow buttons to navigate to "Advanced settings". Press the Record button to select:

- Once you have entered the "Advanced options" menu please head to Step 4 below to learn more about the storage options found here.
Option 2: Companion App
- Open Companion, select your Sound Capsule and head into the settings page as shown below.

- In the settings page, select Sound Capsule storage as shown below:

- Once you have entered the "Sound Capsule storage" menu please head to Step 4 below to learn more about the storage options found here.
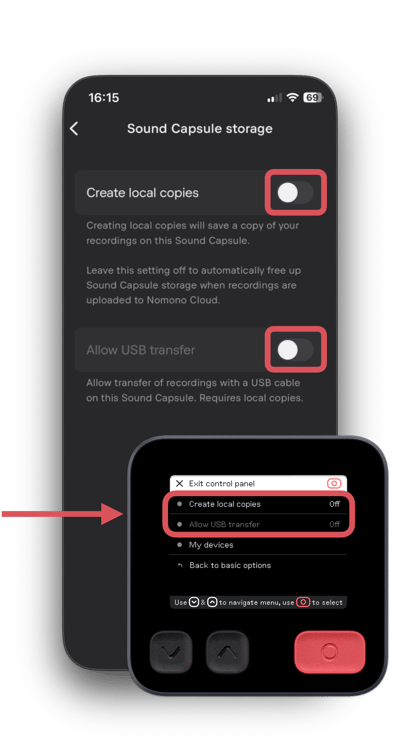
Step 4: Understanding Your Storage Options
The Companion App provides you with three distinct options for managing your recordings. Below is an overview of each setting and what you can expect with each:
Option 1: Both Create Local Copies & USB Transfer Disabled (Default)
Recommended for users who want a streamlined experience and primarily use Nomono Cloud for convenient audio processing.
- How it Works: When USB transfer and local storage are both turned off, your recordings are automatically uploaded to the cloud without storing a copy on your Space Recorder. This ensures your Sound Capsule's storage is always kept to a minimum, and you will have plenty of storage for even the lengthiest recording.
- Key Benefit: Your device remains clutter-free, as recordings are removed from local storage after upload, freeing up space for new recordings. Recordings are safely stored in Nomono Cloud, ready for editing.

Nomono recommends this setting for users who want a streamlined experience.
Option 2: Local Storage Enabled, USB Transfer Disabled
Ideal if you prefer a local backup of recordings for added peace of mind, but still primarily use Nomono Cloud for convenient audio processing.
- How it Works: With “Create Local Copies” enabled and "Allow USB Transfer" disabled, recordings are saved both locally on your device and uploaded to the cloud. This gives you a backup on the Space Recorder, allowing you to enhance and edit recordings in the cloud before clearing local storage as needed.
- Key Benefit: Ensures your files are backed up locally, while the primary access remains through the cloud, giving you added reassurance without enabling direct USB access.

Note: You must ensure that you have enough available space to store your recordings. If your Space Recorder's internal memory is full at the time you start a new recording, you will be unable to start a new recording. If you are in the middle of a recording but are approaching a full internal drive, then you will have to delete your files in order to carry on recording. For easy file management we recommend that you set up your Sound Capsule as shown in Option 1 above, or Option 3 below.
Option 3: Both Local Storage & USB Transfer Enabled
Useful if you are a sophisticated user who in addition to our normal Cloud uplink require immediate, direct access to files and may operate in areas with limited internet connectivity.
- How it Works: Enabling both local storage and USB transfer allows you to directly access and transfer recordings from the Space Recorder using a USB connection. However, the recordings are still uploaded to the cloud when connected to a network, allowing you to take advantage of Nomono Cloud’s editing and enhancement features.
- Key Benefit: You have flexibility to access raw recordings through USB if needed, while cloud upload remains the recommended method for fully utilizing our AI enhancement and editing options.

Nomono recommends this setting to users who require access to their files at all times, particularly when working at locations with limited network access.
Each of these configurations allows you to customize your recording storage based on your needs. While USB transfer can be helpful as a backup, cloud upload is the most reliable and feature-rich way to manage, enhance, and edit your recordings.