Setting up your Sound Capsule
Setting up your Sound Capsule: A step-by-step guide
Congratulations on your new Sound Capsule purchase!
While this guide is here to help, your Sound Capsule and its Studio App have been designed to guide you seamlessly through the entire setup. This guide however, is a handy reference for those who appreciate a bird's eye view of the entire process.
Important: Charge the Sound Capsule in its charging case, with the lid removed, for a minimum of 3 hours before use. A white pulsating LED on the side of the Sound Capsule indicates charging. Make sure all parts of the kit are sufficiently charged before completing the setup process. If you have trouble charging see our charging guide or video demonstration for further tips and tricks.
Have you purchased via Amazon or have an activation code to redeem?
- If you purchased via Amazon, an activation code is included in the box alongside your Sound Capsule.
- View this guide for details on how to activate your subscription.
If you have any questions, please contact us.
Step 1:
Unveiling Your Sound Capsule.
- Place your Sound Capsule on a steady surface.
- Press down the two handles from the top. This action releases the locking mechanism.
- Lift the lid off.

- Once the lid is off your Sound Capsule should come to life.

Do you struggle to charge the Sound Capsule?
If your new Sound Capsule does not appear to be powering on as it should, please head over to our charging guide or video demonstration for further tips and tricks on charging.
How to I turn it off again later?
There is no on/off buttons on your Sound Capsule.
- Simply lifting the lid off will wake it up.
- Put the lid back on, and the Sound Capsule will switch to a power-saving sleep mode.
Step 2:
Download the Studio app.
Your Sound Capsule's display will read: "Ready to connect", asking you to download and install the Studio App on your mobile phone.
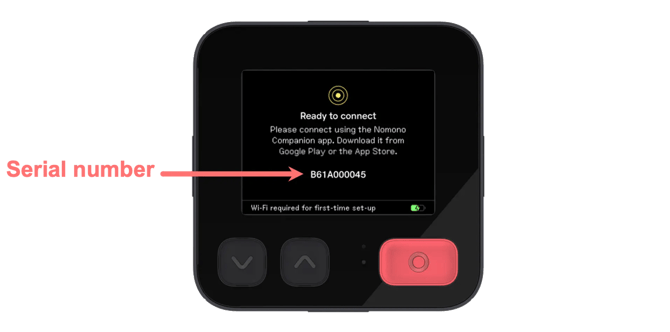
Download the Studio App here:
- Apple users → Find the Studio App in the App Store here.
- Android users → Find the Companion App in Google Play here.
You may also search for the app yourself. Just enter the App Store and search for "Nomono Studio".
Android users: The Studio App is still called Companion on Android OS. We are working hard to bring the Studio App to Android. This guide will differ slightly from the Android startup flow until the new app is available. Please contact the Nomono Support Team if you have any questions.
Step 3:
Setting up your Nomono Studio Cloud account.
- Open up the Studio App on your mobile.
New Nomono StudioCloud users can either:
- Sign up using the Studio app (as shown below), or:
- Sign up using your email address or Apple/Google account at cloud.nomono.co.
Existing Nomono Cloud users:
- If you previously have signed up for a Cloud account, or if you already own one or more Sound Capsules, Log in using the same method as your initial registration.

Step 4:
Account verification.
Note: Only applicable the first time you sign-up to Nomono Cloud. If you are logging in, you may skip to Step 8.
- After signing up, you should see the following message, asking you to confirm your email address:

- Check your email for a message from support@nomono.co.
- Click "Get started"

- If you've verified your email → tap "I've verified my account".
- If you haven't received any verification email from us, tap "Resend email".

Step 5:
Name and workspace
- On the next page you may enter your name and press "Continue".
- This is followed by a new page where you are asked to enter a name for your Workspace. Choose a name and press "Continue".

Step 6:
Your Cloud account has now been set up and a welcoming introduction appears in the app. Press "Continue" to flick through the slides or press "Skip" to skip the introduction.
Step 7:
Press the "Add device" button and choose "Sound Capsule"
Step 8:
If Bluetooth is already switched on, on your device, you can skip to Step 9.
However, if Bluetooth is switched off on your device, or permissions have not been set to allow the Studio App to access your devices Bluetooth, a message informing you of this will appear. Head over to your devices settings and grant the Studio App access to Bluetooth or ensure that Bluetooth is enabled to continue the setup process.
Android: For Android users, a bluetooth-enable pop-up message will appear.

Step 9:
Select and name your Sound Capsule
- Select your new Sound Capsule from the list of devices now shown on screen. There may be one or more devices shown depending on how many Sound Capsules are nearby.
- Enter a name for your Sound Capsule and press "Continue".

Troubleshooting: Studio App tells me to dock devices
If you see the following screen indicating that your devices are not docked, it could mean the following:

- Your charging case is out of battery: If the charging case has ran out of battery then the Space Recorder and all Stelar Mics will be shown as undocked. Charge the charging case for a while and observe the dock state of all parts of the kit. Check out our charging guide for more information
- Dirt or debris in charging case: There may be dirt or debris in the charging case that prevents a solid connection to be established, either between the Space Recorder or to one of the Stellar Mics. Clear out the dirt and try again.
- Improper connection: Try to remove parts of the kit and reinsert them into the dock a few times to see if you manage to re-establish a connection with the charging case.
Step 10:
Wi-Fi connectivity.
- Select your Wi-Fi network.
- Type in the network password to connect
- Proceed in order to connect your Sound Capsule to the network
(we have blurred out the network names in the images below)
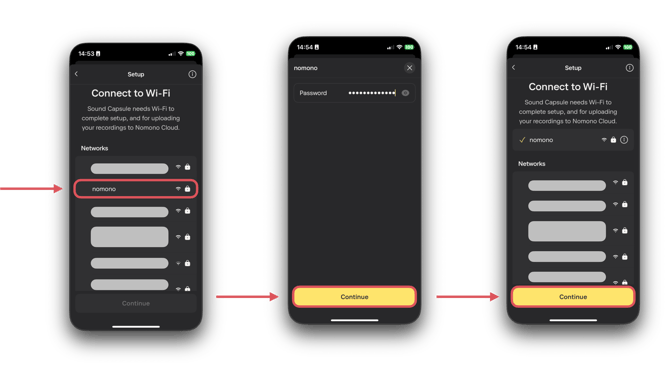
Step 11:
Connect your Sound Capsule and Nomono Studio Cloud account.
- Tap "Continue to verification".

- Ensure the verification codes in your Studio App and on your Sound Capsule match.
- If they do, tap "Confirm" in the app.
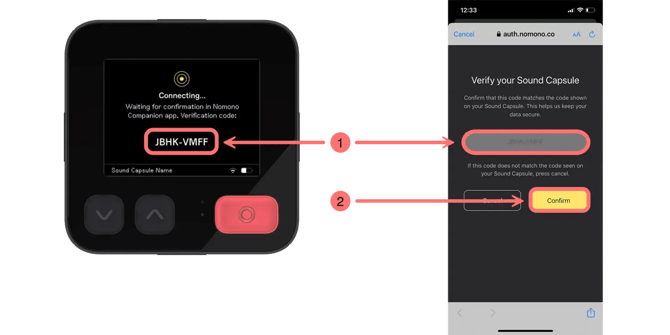
- To continue, wait for the window to close or tap "Cancel" to close the setup screen.

You're all set and the setup is now complete! Feel free to start recording with your new Sound Capsule. Welcome aboard and happy recording!
Enable USB file transfer and updates
Once the setup is completed you may be greeted by one of the following screens. We recommend that you complete these processes as it's always advisable that you run the latest firmware. For more information, please read through the following guides:
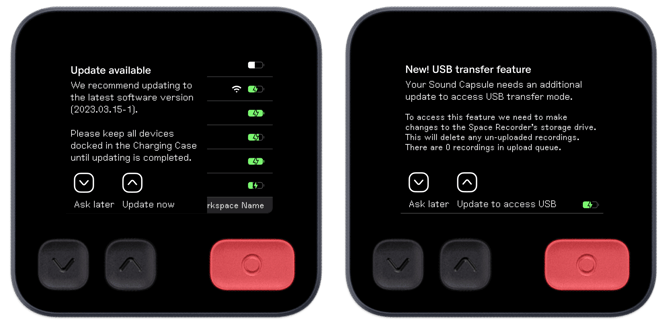
Troubleshooting:
Ensure that all parts of the kit are sufficiently charged before use

- The battery level of all parts of the kit is shown in the column on the right. Ensure that all have approximately 40% charge before use. This is especially important prior to updates.
Note: The charging case is an important part of the Sound Capsule and must be charged to ensure proper operation of the kit.
The Sound Capsule won't charge
- Try a different charger - you may have a better suited charger lying around.
- Try to charge the Space Recorder and the rest of the kit separately
- Watch this video demonstration for more tips and tricks.
Software update freezes
- Try to charge the kit for a few hours.
- Perform a Hard Reset if the update does not resume automatically, or read through our Troubleshooting Update Issues guide.
All four Stellar Mic's activate during recording
If you notice that all four Stellar Mic's activate during a recording, regardless of how many Mic's you intend to use, do the following:
- Check that the Charging Case has a charge:
- The Charging case's battery indicator should be green or white on the Space Recorder display (as seen in the photo above).
- The charging case LED should not blink orange or red, but be off. See this article for a detailed description of the LED behavior.
- Undock and dock the Stellar Mic's a few times to check that they change position on the Space Recorder display. See the photo below:
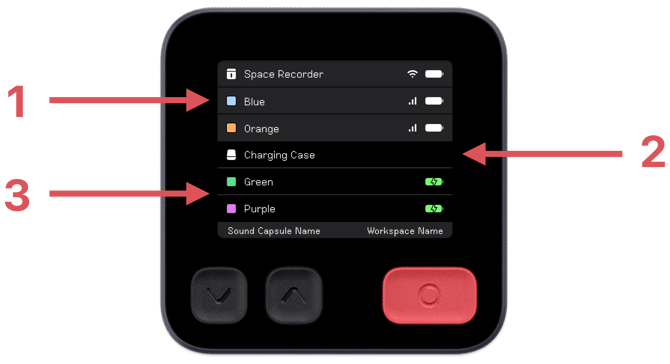
- Undocked Stellar Mic's will be placed above the Charging Case in the list and will have a grey background as well as a wireless signal-strength icon next to the battery level.
- When the Space Recorder is not in the Charging Case, or whenever the Charging Case has ran out of battery completely, there will be no battery information shown on the Space Recorder display.
- Docked Stellar Mics will be at the bottom of the list, beneath the Charging Case, and will be shown as either charging or fully charged. There will be no wireless signal-strength icon shown on docked Stellar Mic's.